Showing posts with label videogame. Show all posts
Thursday, September 4, 2014
SUPER CASTLEVANIA IV - Study No. 8
SCV4's seventh stage is, as I said at the end of the last article, one of my favorites from the game. It's a bit hard to say why, and that suggests to me that this personal preference comes from an interpretation of the stage's tonal qualities, expressed by the mixture of environmental details and music. Coming off of the sixth stage's drama and numerous development, stage seven seems all the more reserved, all the more an inward turn. Palettes are musty and dim; the stage goes through just one environmental shift; enemies take on a surreptitious character; the music is a peculiar, delicate critter springing about with fine notes in a triple time that feels vaguely irregular, describing both the quietness associated with a library and the creaky, shadowy oldness of the place in-game. As rich in visual suggestions as the setting is, there haven't been many library environments in the Castlevania series. Excepting SCV4, there have only been Symphony of the Night's Long Library, Aria of Sorrow's Study, Order of Ecclesia's Library, Lords of Shadow's Abbey Library, and Mirror of Fate's Library. It's a bit surprising to me that SCV4 remained unique in this regard until SotN. Still, despite the series enjoying the theme somewhat regularly later on, SCV4's expression stands on its own.
Stage 7 immediately introduces another carryover: the spear guard. Spear guards were in the first Castlevania, and patrolled a handful of paths in the second stage. They had no offensive capabilities (unless you're counting their somewhat erratic patrol movement), which certainly wasn't a problem in itself, but none of their positions were strategic; if they got too close to an attacking player, the player could retreat for safety and not expose themselves to any complicating factors. Simon's Quest brought them back for its mansion environments, and gave them a charging attack, but the mansions' level design was too haphazard to create strong relationships between the spaces and monsters. Unfortunately, the spear knights remain a misused enemy in SCV4. Despite their new ability to thrust their spears upward at Simon if he is a level above their route, the level design simply doesn't create any chances for this to be a legitimate threat, and so the spear knights come off much as they did in Castlevania: hardy mobile obstacles that the player must whip simply because they cannot be jumped over. The series would have to wait until Rondo of Blood for the first considerate design and application of this enemy type.
Konami was sure to add in a couple of animated details to enliven the place. Enormous books jostle about on their own in cases' shelves, and the eyes of avian-headed statues glow with yellow light. Although the lack of a ground floor in the background is a consequence of the floors' pits needing a visual reason for their fatal faculty, it's an interesting sight -- bookcases so tall that we can't see their bottoms. The windows in the back seem like a strange reduction of a Gothic window where an upper circular design is set above a pair of minor arches within an arched frame. I love the bright, almost viscous green that lines the stonework's sides.
In what appears to be a clear riff on Castlevania 3's extensive vertical rooms (in particular, those from block 5-0A), the library houses a long series of staircases haunted by gargoyle skeletons -- an interesting aerial enemy that flies from one side of the screen to the other in a sine wave that covers an increasing vertical space. Added to this are books that have taken to rebelling against being treated like books, and float in spots before shooting towards Simon. This is actually one of the game's best designed and most flawed rooms: there are ample and engaging threats to deal with as one descends, but it's also possible to drop down a bunch of flights and skip most of the route at the expense of perhaps a slap in the face by a fluttering tome. The only pit is at the bottom, and its placement right under a solid platform makes it nigh impossible to fall into. Weirdness going on in the background: a kind of suspended floor with simultaneous perspectives, and thickets of rectangular windows and recesses (empty bookcases?).
We're now on the third lower floor, and a couple of more thoughtful design challenges happen. In the first screenshot, Simon has to descend to the third platform while minding that either axe armor can throw axes towards both of the platforms facing them. The idea here, probably, was that the upper axe armor would instill self-consciousness about dropping down/descending, and the lower axe armor would need to be disposed to nullify the threat of its axe volleys knocking you into the pit. In my opinion, this could've been improved by squashing the vertical space and having a spear knight below so that the upper and lower platforms that lack axe armors would be less safe. On the upper platform, you'd have to worry about the spear knight's thrusts, and on the lower platform an axe armor to the immediate left would better contextualize the primary "heavy obstacle" function of the spear knight.
Screenshot #2 shows a slicker situation, wherein players alight upon zigzagging, floating books and contend with a couple of platforms along the way, each occupied by an indestructible but collapsible (with two hits) red skeleton. It's one of SCV4's rare resurrections of the first Castlevania's most identifiable and enjoyable design element: design that prompts constant forward movement while invoking tension through the consequential possibilities of pausing or readjusting. There's also an element of required punctuality between the floating platforms' shifting positions and the span of time a red skeleton remains collapsed.
Here, in the library's other even more dingy half, a gallery and armory, is where the stage really grabs my attention. No major design adjustments happen, but, for me, a special atmospheric character develops out of the surroundings' dingy-yet-colorful stillness and the craftier, weirder enemy selections. Minute animations in the painted (pretending to be painted, anyway) woman's face alert players to something being wrong. A whip to her obscured hand's region will make her unable to grab and detain Simon, who can then better deal with the clusters of bats, initially hanging from a frame (and fairly well camouflaged), which fly his way. Walls covered in checkerboard patterns recall stage 4, and we're treated to yet more purples and greens. The paths' stonework gets cruder, and the remotest backdrop has further abstracted.
It's possible that this portion serves as a catacombs, on top of its role as a gallery and armory, but it's hard to say for sure. Frames show within them skulls and limb bones, and some of the frames are comparable to loculi, yet the bones are much to big to be human (not exactly the strongest point to be made in such a videogame series, sure), and some frames, like the one in the above screenshot's upper right, look as though they are housing tattered canvases. Animalistic statues with menacingly glowing eyes, upholding stone spheres, suddenly and harmfully (if touched) crumble when approached. Just within block 7-2's first moments, a few happenings -- the living painting, obscured bats, and unstable statuary -- prompt a guarded response in the player. This greater dynamism and unpredictability in stage design is refreshing.
A skittering creature emerges beneath this path's carpeting and moves towards Simon as he's below a ceiling's row of spikes. It's harmless, but I am sure it was intended to make novices panic and, in their rush to get away from its advance and the spikes, run into a nearby cluster of bats (two are visible to the screenshot's far right) and have to make some split-second offensive decisions. Cool-headed or experienced players will crouch, letting the creature pass underneath without pushing Simon up into the spikes, and therefore have enough room and time to deal with the bats.
Be careful when ascending to this floor. A clubbing knight is hiding in the frame below, ready to strike. The clubbing knight, one of which is visible to the screenshot's upper left, is an unusual enemy -- it's stuck in one place, some position that allows it to retreat behind a kind of wall. This means that it's technically a non-mobile enemy, but its interaction within a given part of a stage deals in layers, and carries a three-dimensional aspect. Clubbing knights appear in four stages total, with stage 7 as the last. They're conceptually interesting as a destructible threat in the stage's makeup itself, but they're not utilized to their full effect. Konami could've instead fully hidden their bodies right up until players were about to pass their haunt, and also lengthened the time they wind up for a swing once they do appear. In this way, the knights would be both legitimate surprises and, thanks to the delay in their attack, have a wider use as a piece of tension-inducing level design. As it stands, their behavior is too erratic to be fair in tighter situations where you might be compelled to keep moving, and their premature visibility makes their horizontal stasis a little awkward. Still, their placement in the highlighted instance is more successful than the others, if only because seeing them pop out of frames is a more striking sight than them just being behind a wall.
The orange canine at the screenshot's top is a candle hunter. It's unique to this stage, and is one of the bestiary's oddest entries -- although basically the same as the zombie dog from stage 6, it leaps at candles during its patrol and knocks them down so that the player can't obtain their contents. The spot to the lower right with the overhanging block housed a double shot power-up, which lets Simon throw out two sub-weapons in quick succession.
This floating worm, known as a larva, has the distinction of being one of two enemies (the other is the dead mate) in the game that is only seen once. It crawls through the air in swirly, unforeseeable directions, and while it can be killed, it has a very high amount of health and its sole weak point is its head. The best strategy is to keep walking and, once you've reached the rightmost part of the room, wait for the larva's horrible, whirling, bubbling sound to disappear -- indicating that it's left the premises -- before continuing along the lower path to the left. The vivid and sudden sight of this immense, raucous creature creates a memorably unsettling moment, and builds on the motif of unpredictability.
The theming stresses the armory side of things in the block's penultimate room, with spears and axes hung on the walls and knights' suits set atop tables further back. A couple of axe armors guard the last hall, and are more interesting to deal with than they have been previously, since the player -- still bound to a staircase, and needing to ascend -- does not have convenient means of engagement. The axes of the one to the right can span most of the given distance, and the armor to the left is close enough to the staircase while being outside of easy vertical-diagonal reach of the whip that the player consciously needs to find an ideal spot to attack. This time around, I was struck by the thought that stage 7's boss might've come as a twist to some players: with block 7-2's skeletal details, empty picture frames, and prominent axe armors, one may have expected Death at its end.
Instead, players are met by a suit of armor that breaks out of its display case and attacks. In his first phase, Sir Grakul alternates between throwing his axe as an axe armor would (but only from his upper half, allowing players to duck under the axe if they're on the lowest level, or -- if they're on one of the platforms -- to avoid it with a precisely timed jump) and slamming it on the ground, causing two flames to crawl along the floor in either direction. After 3/4 of Grakul's health has been depleted, his axe shatters and he withdraws a sword, necessitating a retreat to the closest elevation from which the player can jump over his swipes. There is a bit of strangeness here reminiscent of Koranot's design, in that there is a symmetry to the room whose layout includes two strategically superior points (the elevations), and that the flame attack spreads out both ways, even though it's impossible to get to the right side without being hurt. That aside, this is a solid, exciting boss fight. Sir Grakul cuts an imposing figure, he ties into the armory theme, his voraciousness and adjacency to the player creates tension, and his attacks ensure that you will be making frequent choices on whether to whip or prepare to avoid an assault.
The floor gives way following Simon's victory, and he's swallowed by the resulting void. This echoes the transition in the original Castlevania between stage 3 and 4, wherein Simon falls down a shaft and lands in a subterranean zone. Likewise, next up is the dungeon, in my opinion SCV4's weakest place visually, but housing some of its strongest level design.
P.S. Please check out this great bass cover of the library's theme by YouTube user tiguilherman.
Saturday, March 29, 2014
SUPER CASTLEVANIA IV - Study No. 5
What seems to be an abandoned mansion of perplexing contents, Stage 4 is our first all-interior level. Here, we'll see the stage architecture start to assume a more hostile attitude. We will also see one of the rare instances where the game's normally clear conveyance of room-by-room progression gets muddled. Stage 4's musical theme, "The Trick Manor," has the distinction of being the only other piece from SCV4 (counting "Simon Belmont's Theme") to appear in a future title (that being Circle of the Moon). "The Trick Manor" is actually two separate tracks: one that plays for the majority of the stage, and another that comes in around the tail end. The first half is rather novel in having a variety of tonal and non-tonal effects that function musically and have the presence of ambient noise; what is produced is a delightfully Halloweeny atmosphere of rattles and wiggles. The second half borrows a motif of the first (played upon an organ) for its unrepeated opener and proceeds to a repetitive string of anxious, incessant chords and an almost nonsensical woodwind melody flung out near the looping point. It's a nice complement to the weirdness that the stage delves into.
Two new enemies are introduced right away: the skeletal knight and the dryad. Skeletal knights, from CV3, are an improvement in SCV4 upon the normal skeleton if only because their method of attacking -- a single quick slash of their sword -- has more aggressiveness than that of the tossed bones. It still was an odd decision for Konami to let players duck under knights' swords, especially when the weapon at its lowest point is right on top of Simon's head. Dryads -- first showing up in Haunted Castle's stage 1 -- are humanoid creatures that sprout out of walls when players are at a certain distance away from them. Like some of SCV4's other monsters, there isn't a real challenge to dealing with the dryads; any threat they have is related to the surprise of their sudden emergence (and dryads, once they have emerged, can't do anything except make grabs at Mr. Belmont).
Stage 4 color- and texture-codes platforms -- those green bits in the screenshot above -- that flip about when they're landed upon from a jump or fall. It also provides an initial opportunity for players to understand these platforms' mechanics without fatal failure (making the lack of such features in the part of stage 1 with mechanically analogous platforms even harder to understand).
Hanging skeletons are another one of those Surprise! enemies, sprouting from walls in the background and swiping their hands about, an expression of joviality on their face that goes well beyond the usual eternal grin of skulls. Simon can crouch-walk under them; or, if players need a target to direct suppressed aggression towards, they can choose to attack. The skulls embedded in the wall, mechanisms or still-living deadheads, follow Simon's movement -- a decorative touch that specializes the setting's ambiance and reinforces Simon's physical presence.
The screenshot immediately above illustrates a part on the stage's second story where players must mindfully contend with isolated architecture. Simon is not a Mario or a Bill Rizer -- his body is weighted, heavy. There is a delay after he lands from a jump (especially if there's a height difference between the jumping and landing points). If you want to make a consecutive jump, this delay can be minimized only by a precise press of the jump button a split second after impact. Avoiding the pitfall here is a matter of being quick and conscious, making for a pleasant change of pace.
As was done for stage 2, I've included a fairly obscured background above from stage 4's third story, seen outside the lancet windows. Aside from the wonderful, grave rendering of the night sky, there also are those purple forms of uncertain distinction below. They could be the tops of leafless trees, considering the height of the view. They could also be a crisscrossing field of thorn-like spikes lining the roof of an adjacent structure, or protruding from the ground far below.
A sudden encounter with a skeleton knight near a ledge -- which, granted, would be better if ducking weren't a way to avoid the sword (a much later stage, the clock tower/level A, has a similar set up with greater tension, thanks to how you get to the knight). Let's take a moment to admire, or just acknowledge, the bricolage-like interior. I'm especially fond of the wooden beams near the top of the screenshot that give the surface a skeletal, ribbed look; the contrast of the finely sculpted stones and the untouched masses in the lower right; and, earlier on, the bright orange shutters set in the dark-stoned walls. Although the textures overall are not especially ruinous, one gets the feeling, by seeing all of these details, of an almost makeshift evolution of the building's interior, as if disparate bits and pieces have been added over the years to replace or go over older parts.
Puwexil, the stage's mid-boss, typifies a common critique of the game's bosses, which is that, provided one has a healthy lifebar and an upgraded whip, one can stand their ground and slug it out to victory with around half of their lifebar remaining -- or more, if the cross/boomerang subweapon has been picked up. Of course, the (willful) loss of health is a punishment, but the game is just not equipped to make that loss feel worrying. Puwexil's order of business is floating about in its room, as spectral skulls are wont to do, projecting a segmented tongue (making it a possible point of influence for the Man Eater monster in Aria of Sorrow and Order of Ecclesia), and making destructible debris rain from the ceiling that looks suspiciously like giant almonds.
With Puwexil out of the way, we're confronted with a situation that's worth talking about for a couple of reasons: it's a unique portion of level design, and it has played a large, almost single-handed part in perpetuating an opinion that CV4 is a "tech demo" in the most obtrusive sense of the term. Here, Simon ascends a staircase, and then has to latch onto a hook as the entire room rotates 90 degrees counterclockwise. When it stops, players drop to a platform and fend off, or avoid (less easy to do), Medusa heads that come from the left and right sides of the screen. As usual, this would be a more compelling situation were there stricter limits to Simon's offense (and if the platform were smaller), yet it still demands a decent level of rhythmic attention to be overcome -- unless you're a Super Speedrunner who's found the perfect place to let the whip droop. Soon, the Medusa heads cease, and the room rotates one last time (again 90 degrees counterclockwise), and has the player wait for a path of bricks to bridge itself from the left towards Simon, who then must swing from the hook -- without grazing the row of spikes below -- and land on it.
It's reasonable to criticize this portion for the way that it mismatchedly stands out as a detached set piece in a game that, overall, flows from one point to the next; and also for the fact that hanging onto a hook and waiting for a room to show off its ability to rotate isn't very exciting. Once these criticisms have been voiced, though, we can also admit that the set piece is over in less than a couple of minutes, and, in its uniqueness, can't be turned into an extended criticism of the game as a whole. The "tech demo" critique is one that, I think, can be much more aptly applied to a Castlevania game such as a Bloodlines (and I'll aim to show this in the respective articles).
We exit the rotating room from the left, but drop down into the next chamber as we would if we were exiting from the right. If you're worried about this becoming a trend, don't be (and if you want to witness a game that suffers all over from mindless stage progression, see Dracula X). This chamber -- a barrel vault made into an entire unit and given the power to rotate one way and the other -- is, realistically, the last time the label of "tech demo," applied with a sneer, can be put on CV4. If there's annoyance from the background's lack of an interactive function, and its heavy toll on the framerate, one can perhaps appreciate that they don't have to wait around for anything to try to impress a 1991-audience. We can walk ahead at our own pace, just making sure to avoid skeletons that burst and fall from the ceiling. Here is also where the second part of "The Trick Manor" begins to play. In my opinion, this is a charming slice of the game, if only because of course the room is the way it is simply due to someone at Konami wanting to show off that special effect.
Block 4-4, stage 4's conclusive block, is a sort of disheveled maze set inside a cavernous environment. Other than a bat or two fluttering near the start, and several bone pillars at the end, this place is monster-free. To reach the boss, players navigate a mixture of rising platforms and static architectural clumps. The ideal path is, in fact, very brief -- a few struts, crouch-walks, and jumps away -- but the seeming variety of routes can prompt novices to wander. 4-4's main threat is crushing adventurers between rising platforms and ceilings, a couple of which are lined with spikes. You'll have to get an idea of how structures' shapes converge to know when and where it's safe to move. Continuing the stage's trend of oddness, this block houses a shaft that, for whatever reason, infinitely loops until it is exited from (you can see the zone in question here; it's the vertical stretch with no apparent top or bottom). I think it would've been nice if this block were longer; something is lost between the hugeness of the backdrop and the interactive space's smallness.
Taking the correct path leads us to a snippet that references a feature of Castlevania's second stage: a trio of spiked mechanisms moving up and down. It's nothing that a modicum of patience can't solve. Past this, players are confronted by a stepped mass of stonework that rises towards a toothy ceiling and reappears below to continue the pattern. Surviving this ascent means boarding the mass as soon as it's accessible and ceaselessly walking right. Now, there is nowhere to go but up a small series of alternating staircases, since the mass we boarded sets itself up as a permanent wall once we've disembarked. Three bone pillars guard the way -- although, as I suspect readers will intuit, these fellows come across as space-fillers, and not as an unassumingly legitimate pre-boss barrier. Note that the background, originally scaly rocks of green, has transformed into an enormous brick wall ventilated by massive arches; and outside is a still pine forest stretching to the horizon.
The music fades out, the backdrop dims to pure black, and two platforms that float up and down appear, setting the stage for stage 4's boss, Koranot. Although it's a better effort by the developers when compared to prior bosses, it's not a total success. Koranot starts out as a towering golem whose size diminishes and walking speed increases as it takes damage. Its methods of attacking, as it patrols the floor, are tossing bricks at the player and jumping up and down to make a hail of stones (with safe spots in between) drop from above. There is, for sure, an immediacy and activity to this fight that's been missing in the others. What it lacks, though, is a fitting usage of the space that's been given. The platforms are a weird decision: Koranot doesn't advance far enough to the left or right to make them structural safe-havens (most mysterious is the right platform, considering that Koranot can't be gotten past without the player taking damage). The fight with Koranot, as it is and as it could be, is similar to the fight with CV3's cyclops; but that fight had risks associated with the space and player's actions. The cyclops patrolled the entirety of its room, and getting in position to hit its weak spot -- its head -- meant exposing oneself to its erratic behavior. It certainly wasn't a highlight of that game's bosses, leaning to the side of attritional design, yet it had an element of danger that the fight against Koranot, with the inexplicable platforms and overly-safe left side of the screen, doesn't have.
I may as well say right here that, relative improvements aside, CV4's bosses don't come into their own until the late part of the game. So be prepared!
Next up is stage 5 -- a short, sodden path that will lead Simon into the castle, and whose main purpose is atmospheric.
Labels:
analysis,
ario,
brick by brick,
castlevania,
castlevania 3,
diplo,
diplocephalus,
level design,
super castlevania 4,
videogame
Friday, February 21, 2014
SUPER CASTLEVANIA IV - Study No. 4
Stage 3 is the last time a level divides itself into three distinct parts. It's easily the most dramatic of the tripartite stages, with its elements of vertical progress and the return to the upper world, and its sections' different musical tracks. Yet it also feels the quietest of the treks thus far, due in large part to block 3-2 and the music's general mellowness. Our watery path has taken us to a cave populated by mud men, bats, and bone pillars. There are no deadly pits here -- just the occasional bed of spikes, which I like to imagine as thorny cave formations, rather than as the literal videogame trope.
Aside from stage 5, stage 3's blocks 3-1 and 3-2 are SCV4's most easy-going spots -- interesting, since block 3-3 is, as I said in a previous article, the section that is likeliest to stand out to players as the first time that the game demands more than just a standard level of attentiveness. But let's be clear: block 3-3 is not some hellish gauntlet. It's simply a few steps up from where we were before. Let's also be clear that SCV4's difficulty does not linearly escalate -- that is, one stage is not necessarily tougher to cover than a stage before it just because it comes after. Although I sympathize with people who yearn for a progression of difficulty akin to, say, Castlevania, I also feel -- as I do about the visuals -- that enjoyment can be gleaned from SCV4's uneven progression, provided one is not prepared to dismiss the unevenness on the basis of that alone. This is a game with a lot of breathing space, and a game that asks to have that breathing space admired.
It's significant that SCV4 is a continuation -- a SUPER continuation -- of a series that, around its time, had pretty much solidified itself as a home to hearty, burly action; and yet the game presents itself as, to borrow a phrase (although I know he did not coin it) from YouTube user Errant Signal, a tone piece, and one that, while spectacular in its own way, sidesteps (or walks away from) the bombast or emotional immediacy one might assume it would pursue. We can hypothesize different reasons for why games had, or allowed for, more room for "introversion" -- for approaches that favored forms of quietness, or things outside of the realm of Non-Stop Action -- as technology progressed, but SCV4 was made at a time when "extroversion" was such a dominant aesthetic that to make the generalization that it was the only aesthetic doesn't seem too unfair. And it's all the stranger since this game is, to a degree, still guided by the kitschy horror elements of its forebears.
You can reach a hidden chamber full of goodies here if you whip a bunch of uniquely shaped, and unnaturally (relative to the game) assembled, rocks. This is the first time that SCV4 lets players know that it holds secrets that are a bit more extensive than walls whose first layer can be chipped away. Check out the messy, cut-up arrangement of tiles for the brownish speleothems in these screenshots. Despite occasional snags, such as where the tiles have a clean horizontal slice on the tops or bottoms, the disorganized layering of stuff helps to further the formations' strangeness. A more obvious and appealing sight is the far background, whose columns, stalagmites, and stalactites are of a green, almost luminescent hue. Pure black pokes out from the view's furthest reaches, giving us the sense that, although the path we must take is short, the cave's total scope is massive.
Near the block's end, a few rows of stalactites quiver ominously. Of course, these stalactites do fall, but they can all be passed by before then if one keeps pressing on (a minor callback to the momentous dynamic that informed so much of the first Castlevania) -- except for the last row, where a mud man (see the third screenshot of this entry) patrols the ground below and must first be destroyed for safe passage, necessitating a tiny retreat and pause. The mud men are very obviously technical wonders and little else (very slow; no offensive options), existing so that players in 1991 could've marveled when they whipped the enemy and saw it split into two smaller versions of itself, each of these splitting into a pair of even smaller versions with two further whips. During these divisions, the particle effects take a massive chunk out of the framerate, so it's perhaps a good thing that mud men exist in low-risk spots.
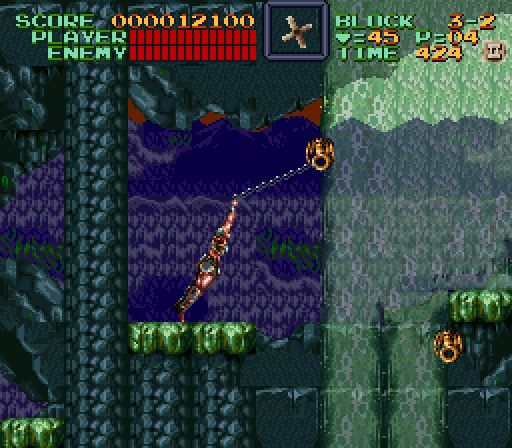
Exiting from the cave, we find ourselves near the bottom of a series of greenish falls, and faced with the task of scaling a series of rocky platforms jutting out from a natural wall. Technically, there's not a lot to talk about here. Block 3-2 is a glum intermediary between the first and third blocks. The unmitigated ascent helps to impart the idea that Simon is working towards an environmental climax, yet there are almost no parts in the game that are as tranquil as this; and there are definitely no other blocks that house such sparse, anchored music. Bone pillars, unes, slow-moving bats, and fizzling orbs that guard the boundaries of platforms (first appearing in CV3) are all you have to deal with. Whip-swinging comes into play again, although it remains an unmarried interactive dynamic, not yet complemented by complicating enemy placement or spatial design.
Block 3-2 shows off another unusual mixture of colors, and one that, like several others in the game, inescapably makes me think of the palettes of some German expressionist paintings. Of special interest is the perplexing backdrop depicting what appears to be a forest (very curious representation here: jagged, vertical etchings with a severe absence of depth and perspective) and mountain range, all cast in deep purple shadow, and a brown-red sky above. Have we emerged into sunset, sunrise, or a timeless zone in between? More ambiguity. There are plenty of candles along the path. Most players will probably acquire close to the maximum number of hearts (ninety-nine) by block 3-2's end. Keep in mind that this is still part of stage 3! Getting the maximum number of hearts two-thirds of the way through a stage in, say, CV3 never would have happened. Running out of hearts, or having a low amount, is not a thing that will occur very often in SCV4, unless you're dying a lot and using subweapons as if they're your main weapon.
Speaking of subweapons, I've forgotten to bring up a mechanical change SCV4 makes. Beforehand, subweapons were used by pressing the attack button and up on the D-pad at once. This conflicted with the usage of staircases, since the necessity of pressing up to use a subweapon could make a player's stair-climbing avatar walk up a step before attacking. It's understandable why this was the way of things -- there were only so many buttons on the NES' controller -- and, sure, having a little wrinkle in the subweapon mechanic that was tied to site-specificity was sort of cute, but it remained a consequence of the less interesting variety of limitation (that is, literally how many buttons were on the controller). SCV4 has the benefit of the SNES controller's greater buttons, and so it maps subweapon control to the R button on the right hand shoulder. Problem solved!
At the top of block 3-2, Simon has to make a barely-made-it leap onto a ledge leading to the next block. A pair of columns indicates that we're entering a less natural environment. We also can see the top of the waterfall. The source must be nearby.
But it's over with almost as soon as it starts, and we're onto our first bone dragon, seen at the right edge of the screenshot below. Similar to other imported enemies, not enough has been done to the bone dragon -- it still sprouts out from a wall, wiggles upwards and downwards, and spits out the occasional straight fireball -- to make it a match for the new Simon. SCV4's enemies, like those in the NES trilogy, pause for a split second when they are hit by the whip or a subweapon. This carry-over, combined with Simon's octo-directional whip and the bone dragon's behaviorism, means that players can walk up to and stand under the enemy when its body and head are above Simon and whip upwards a good number of times before the bone dragon lowers itself. Even so, bone dragons are hardy and erratic enough to be at least more of a threat than bone pillars.
Block 3-3's most impressive asset is its music, a dynamic jazz piece in 3/4 time, full of rhythmic surprises, passages with an improvisational flavor, and lead trade-offs that give the sense that a virtual performance is happening. There is no other music on the system that is exactly comparable. Highlighting this track also calls to mind the point that, as technology allowed more aesthetic freedoms, Castlevania incorporated into its qualities an appeal based upon unexpected unions. To be sure, that appeal was already present from the start, but it was more or less limited to the straightforward contrast between the games' horror-derived motifs and the charged, highly melodic music. But with SCV4, we start to get a richer array of medleys, an example of which is this mixture of "free-jazz" and "classical" architecture. One of the greatest mistakes of the recent Castlevania titles is that they have lost this contrast; instead, the developers have obsessed over an appropriateness between narrative, visuals, and audio. The irony is that such a confluence yields only drudgery, because what is appropriate is what is expected, and what is expected in a series about hyper-masculine men killing monsters is the cliche. Lords of Shadow's music is "dark" and "cinematic" because the game is "dark" and "cinematic." Appropriateness has long threatened the series, like a phantom, and it would've been an easy thing to succumb to each step of the way. Although I want to say that it was the games' Japanese teams that allowed for this oddness to develop, I can't; there are different levels to the eccentricity on display in Konami titles. Rather, I think it was a mixture of that non-Western handling of Western elements and the creative powers of those doing the handling.
Once we've climbed a staircase to an upper course, the mermen assume a relative passivity by remaining in the water, after they've swum up from below, and spitting out angled shots of water. The best way to avoid this is by pressing on. With the presence of minor but potentially irritating enemies such as the fire eye (a floating eyeball that pauses here and there to drip a fireball) or une, and the reappearance of the whip latches in more demanding zones (players must respect the possibility of a merman coming up beneath them when they're swinging across a watery gap), a series-roots momentum -- or a need for momentum -- appears that thus far has lain dormant.
The last room is a climb to the boss, and has a couple of curiously placed bone dragons. Rectangular openings in the wall all of a sudden spring links while you ascend, and if you get under the waterfalls there's a nice, existence-acknowledging bubbling effect around Simon's body. Seen below is the first bone dragon, and, as you can tell by what Simon is doing, it's possible to under-attack the creature without putting yourself in harm's way. The second bone dragon's position, too high to interfere with a nearby whip latch and too low to block off a mandatory staircase, effectively makes it a warning, and not a thing you must deal with. You can, however, take care of it if you're so compelled.
Three divebombing crows are the realest threat along the way here, coming down upon Simon as he's scaling a staircase that's a few tiers away from the boss. It's half-cheap and half-smart: their convergence is almost too quick for novices to reasonably avoid being hit once, but they are a justification for the octo-directional whipping in a game that has a dearth of such justification. It's best to stay on the staircase and take care of all three. Making it to the level above with a remaining bird or two runs you the risk of being hit by one and getting knocked into the pit on the right.
I'm happy to say that this is not an auto-scrolling section. CV3 introduced those, and they were infuriating -- vertical parts wherein, every three seconds, the screen shuddered and, with a crash, moved up two brick-widths. This was a bad idea for two reasons: 1) you had to moderate how fast you ascended, as enemies' sprites could generate on top of you once the screen caught up to your spot; 2) the scrolling had no in-game basis, and was reducible to "Because Videogames." Number two felt especially egregious when you realized that nothing else in the game's level design worked this way. These were moments where atmosphere and context were rubbed out in favor of challenge.
Additional wall-openings gush out liquid at the top and raise the water level up to the lowest platform. With this, the fight begins. Stage 3's boss, the Orphic Vipers, can be seen as a glorified couple of bone dragons. Both weave up and down, and back and forth (but never forward enough to hit where Simon is in the screenshot), and both have the ability to project flames from their mouths (one shoots out three fireballs in a spray pattern, and the other ejects a static flame with limited range). All that's required to win this fight is keeping your distance and making sure that one of the three fireballs shot from the respective serpent head doesn't hit you. As usual, having the cross subweapon is a huge help. CV3's Water Dragons, with their guessing-game behavior, limited openings, and their room's dangerous, tight layout, constituted a much more interesting tussle than this. SCV4's Vipers burn up and collapse into the water as skeletons upon their defeat.
Dracula's castle nears. In the next entry, stage 4, the bizarre Sorcery Tower, will be our subject.
Subscribe to:
Posts (Atom)


%2B%5B!%5D.008.png)
%2B%5B!%5D.010.png)
%2B%5B!%5D.005.png)
%2B%5B!%5D.012.png)
%2B%5B!%5D.007.png)
%2B%5B!%5D.014.png)
%2B%5B!%5D.015.png)
%2B%5B!%5D.017.png)
%2B%5B!%5D.018.png)
%2B%5B!%5D.019.png)
%2B%5B!%5D.021.png)