
After stage 6's showiness and the offbeat curiosities of stage 7, stage 8 feels like somewhat of a visual downgrade, even though it does have a nice variety of details and continues the subtle polychromaticism that garbs much of SCV4. Stage 8 is also host to one of the soundtrack's lesser pieces. It's not so much a fault of the composition as it is its unfortunately mushy expression through the soundfont. It's an unexpected thing to say, with how great SCV4 sounds to this day for being a Super Nintendo game. For a preferred alternative, allow me to point readers towards an FM rendering of the piece by YouTube user the_muteKi. But for whatever it may lack in atmospheric particularities and dynamics that leave some lasting impression, stage 8's level design ratchets up its expectations. It's hard to not notice this, at least intuitively, with the compressed layouts and abundance of environmental hazards, many of them spelling out instant death. But the cellar/dungeon is also unusually considerate with how it arranges enemies, even if the arrangements don't always succeed. It will also probably be the most difficult stage for novices so far.

The beginning is a little odd. Stage 2's spider enemy is reintroduced twice after a long absence as a barrier between Simon and a pit, and then goes away, never to return. More sensibly, players are given a chance to deal with a couple of spiked mechanisms in a low-stakes context. The mechanisms perpetually raise up to the level of their gears, freeze for a moment, and then plunge downwards. For a while, spikes were incredibly prevalent within videogames as a visual device to indicate danger. This trend began to die out during the transition to 3D as the dominant representative dimension. Today, it's almost only seen in games that make some attempt to reference bygone design. When people played SCV4 for the first time, they -- being so instilled with the idea that getting near spikes at all is a very bad idea -- may have never discovered that Simon is able to stand atop these mechanisms. Although this is not necessary for getting through the stage, it can help as a navigational alternative, and also by partly dismantling the spiked objects of that aura of danger.
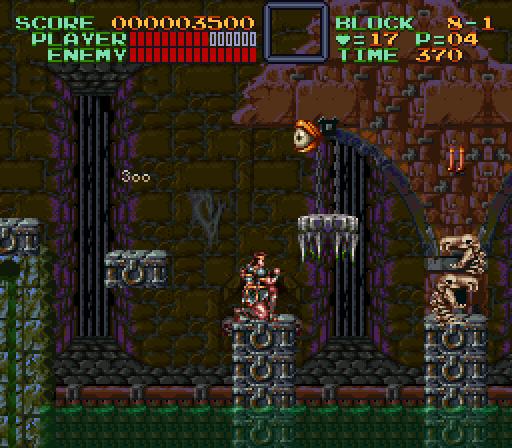
A few graphical touches that are easy to miss catch my eye here. The first is the fence that foregrounds the path. It seems out of place -- something wooden and fragile in an environment that's otherwise all stone and brick; and fences aren't things that we associated with the indoors. The second is the purple coloring that surrounds the barred fracturing in the wall. Is it illumination, or some slimy substance coating the stonework? And lastly is the contrast between the ruggedness of the majority of the background and the almost metallically smooth, gray chunks that line the ceiling -- a touch that's especially easy to not notice when the HUD is getting in the way. It seems to me that designing virtual dungeons/prisons of some fantastic character as places that better reward the imagination is difficult most of all because one of the architectural convictions of the prison is that, as it is housing society's "worst," it should be under no obligation to stimulate or comfort. The drudgery of prisonic existence is in part an effect of the drudgery of the prison's look itself. This conviction is in fact full of all sorts of interesting implications (as an example, look up George Dance's redesign of Newgate Prison), but it's very easy to use it to boring, cliched ends.

%2B%5B!%5D.001.png)
Green droplets of what I guess are an acidic liquid fall from some of the ceilings. In the Japanese version (see the second screenshot), all of the liquid was red, and assumedly blood. This is another silly instance of censorship, but in this case I actually do prefer the US/EU version, just because it looks more chromatically complementary to the stage and is in line with the game's coloring habits. Like the low-stress introduction of the spiked mechanisms, the droplets here have been isolated probably to make players aware of them as a prevalent hazard before they're pushed into tougher spots. My only issue is that, since the HUD obscures the ceiling, telling where the droplets are falling from is unnecessarily difficult. An unsprouted une can be seen to the right. Its situating as a camouflaged, unassuming surprise is effectively similar to the surprises of stage 7's second half. With the une and the droplets, we're prompted to pay closer attention. Behind us, the cellar's artificial constructs have fallen away to reveal that a cave surrounds the greater area.

We come across something here that really should've been happening long ago: bone pillars being combined with another enemy so that progress is not a simple matter of advancing while casually slapping the bone pillar to death. As explained in this series' earlier entries, even if bone pillars were by themselves in Castlevania or Castlevania 3, the mechanics (for example, lacking the ability to dangle the whip and nullify projectiles) more evenly matched your avatar with the enemy. This is an arrangement that I feel is brought down most of all by Simon's ability to whip upwards; but the simple interaction of intersecting projectiles -- the horizontal lines of the pillar's fireballs and the vertical lines of the fire eye's droplets -- helps to engage the player's efforts.
%2B%5B!%5D.015.png)
This set up is so close to being a really interesting thing! An axe armor blocks your way, and its advancement limited by being on slightly higher plane that it can't drop down from. Close by is another spiked mechanism, one that swings back and forth like a pendulum. It seems like the designers wanted players to feel pressured between two hazards. Unfortunately, the pendulum is ineffectively situated: it's too high to be jumped on, and it's not low enough to be a threat unless you're jumping -- and there's no reason to jump. What would have made this work was if the platform were low enough to necessitate that Simon crouch-walk to advance, or so low that it needed to be jumped over, perhaps with a spike on either side so that the platform's top was the only safe surface. In both situations, the pendulum would be a periodic impediment and a thing to possibly mount for some geographic advantage. As it stands, this setup misuses its parts: it's just another axe armor with an environmental hazard that is a hazard in appearance only.

%2B%5B!%5D.000.png)
Players are given the option of following a lower or upper path here with no view of the end of either. It turns out that the upper path is the one players will eventually want to take; the lower one is a dead-end, and just offers a few candle-bound goodies. This part should confirm to everyone that the flat tops of spiked platforms can be stood on, since the upper path is reachable only with the platform to the left of the first screenshot. On the upper path, which is interrupted by two spiked mechanisms that slowly move up and down, you're met by a couple of fire eyes coming from the right. The first will hit Simon if he's not crouching; the second, near this part's end, is further above, and is only a threat for its teardrops. This would feel like a mostly complete stretch if there were a bone pillar on the platform that's between the spiked mechanisms. To Konami's credit, there is one near the path's end, and it can only be struck with the whip by meeting it on its platform. Despite Simon's abilities, the intense proximity of the bone pillar, the droplets of the fire eye above, and the spiked mechanism just behind Simon can make this a tense moment.
I really like how the mechanisms' courses have been represented. From the screenshots, it may look as though they are behind parts of the wall that have been torn down, but (perhaps the last course in the second screenshot gives this away) in-game, thanks to the disparities of scrolling speed between layers, it is clear that they are parts of the foreground. In fact, they are projections from the ground with jagged edges, seemingly half-natural and half-artificial.

Before we ascend to an upper level, we have to contend with a tricky and well-designed set piece. Simon has to get to the floor whose edge can be seen to the second screenshot's bottom-right. However, a mechanism -- like those near the stage's start -- and a bone pillar guard the way, and are surrounding by pits of harmful sludge (a fire eye appears early on, and will likely cause most players to backtrack a couple of jumps just to deal with it on surer footing, so it's not much of a player in the scenario). Simon can whip the bone pillar, but getting close enough to do that without mounting the mechanism's top (this poses its own inconvenience: the mechanism comes down to the bone pillar for only an instant before retracting, and when it is at its apex, Simon is exposed to the line of fire from an elevated bone pillar to the right) exposes Simon to the mechanism's leftmost spikes. If players retreat to the floating platform to, say, use a relic like the axe, the first bone pillar's fireballs will hit Simon in the legs, and so require some fast, precise jumping or awkward whip dangling. To me, this is a great moment of level design because it allows different ways of tackling it, and each way presents a couple of complications. This is actually the first in a trio of gauntlets that stage 8 places in its three main horizontal rooms before transitional points.
%2B%5B!%5D.016.png)

On the second floor, we're met with more falling and swooping mechanisms. A lone candle, holding the stopwatch relic (very helpful for an upcoming part) is placed alluringly in a shallow along the route. Be mindful, though: even if you crouch under the pendulum, it's set low enough that it'll strike Simon, so you need to approach the candle when it's swinging to one side. Soon after is a bit that I think can be read as the developers attempting to surprise players. You're simultaneously presented with a row of candles and a fire eye that flies in from the right, and both most likely will compel you to slow or halt your movement to do some whipping; but there's also a string of pointed rods embedded in the ceiling. Passing under a rod makes it fall. With the obviousness of the rods (not only do they stick out far -- the space between us and them isn't interrupted by any structures, making us more aware of any new details) and the clear walking path, this has little effect as a legitimate threat. Ideally, I think, Simon would be pushed to the right by some threat that appeared from the left while confronted head-on by a weak enemy (e.g., a bat) that appeared from the right.
%2B%5B!%5D.017.png)
%2B%5B!%5D.012.png)
Simon is challenged by two bone dragons. Short work can be made of the first one by snagging the rosary from the second candle in the first screenshot. The second one presents the most interesting usage of the enemy so far. Simon can leap to the second platform for a direct assault, but it's not advisable because of how exact you need to be with the whip to nullify the dragon's fireballs as soon as they exit its mouth. Of course, you could jump away before a fireball is emitted, but droplets perpetually fall from the ceiling between the platforms. The safest approach is standing at the edge of the first platform and attacking with horizontal strikes when the dragon is low enough.
%2B%5B!%5D.021.png)
%2B%5B!%5D.022.png)
A bridge that starts to collapse behind you after you walk onto it is a setpiece that's seen enough usage in the Castlevania series to be considered a bit of a staple. The instance of it here reminds me of the end of the eighth stage in Dracula's Curse, but I think that's just because both bridges are made up of square blocks. This is not a long bridge, nor is it heavily populated -- you're only confronted by two bats slowly flying close to one another, and another bat that swoops down from the top right near the bridge's end. The trick here, I think, is fighting against the impulse to attack. Whipping is doable, but it slows you down; it's much easier to get by with careful, nimble jumping. The last bat is meant to be a surprise, and, like a good surprise, it gives players enough time to react.
It's important that the developers used weak enemies here. Although whipping does slow you down, the bats can be killed in a single whip, and that leaves the option reasonably open. So many times I've seen sequences in fan-made Castlevania games where the player is pressured to keep moving, lest they fall into a widening pit or are struck by a trailing threat, yet the path is patrolled by enemies that are unreasonably hardy. In these sequences, the difference between requiring one and two hits is huge. Your reward for making it across the bridge is the cross subweapon from a candle. This candle is near a couple of platforms (seen in screenshot #2) that can only be gotten on from the bridge's side. If you do fall, you'll take damage from the liquid below and may die if your healthbar is straggling.
%2B%5B!%5D.025.png)
%2B%5B!%5D.027.png)
Block 8-2 opens with a vertical room that plays up the stage's overall compressed build and combines it with enemies that have some element of surprise to them. There's an attempt at mixing Medusa heads in -- a great idea! -- but it's weirdly inconsistent and sparse, for some reason. In the first screenshot, you can see that I've forgone the stairs and dropped down to the left for a candle, and consequently have to get rid of an une before I can continue descending. The second screenshot shows another point with alternate paths: you can go down on the left, but you have to make an awkward jump over a spiked mechanism (Simon's head grazes the tier above, limiting the jump's height), or you can risk going down on the right -- a risk because it's not clear if there is a pit or a floor below. While it turns out that there is flooring, a friend from stage 4, a hanging skeleton, pops out of a hole (seen in the screenshot's bottom right) and requires that you quickly move out of the way. In a weirder than usual move, Konami discolored parts of several staircases and made it so that if they are struck, they break apart and can harm Simon, if he's close enough, with the debris. It's interesting, but none of these parts are really in spots where Simon would whip, so the other criticism of the parts' questionable readability as potential hazards doesn't quite manifest.
I love this room's furthest background: stacks of brown and blue bricks that are zigzagged by stairs and lined with floors, and perforated by arched and circular openings. No matter how grimly and bluntly bricks are presented, to me, their multiplicity and uniformity evokes a lovely finickiness. This background is sort of an architecture unto itself -- different from how Castlevania backgrounds tend to be handled, which is as complementary but somehow detached backgrounds that enforce the explicit structural quality of the foreground by the absence of that quality in themselves. You can imagine stepping out of the foreground here and onto parts of the shady rise.
%2B%5B!%5D.036.png)
%2B%5B!%5D.029.png)
It's clear by now that the spiked mechanisms are being arranged in more uncomfortable ways, as we're greeted by two that, due to having shortened courses and being right next to one another, more or less necessitate crouch-walking to get past them. For some puzzling reason, the last staircase leading down from the room above has a destructible portion. Hanging skeletons become a regular enemy here. They don't come out of every hole in the background (such as the hole seen behind Simon in screenshot #2), though, so there's a tension of not always being met by what one expects. To be frank, the last part of 8-2 is a bit of a disappointment. When compared to the previous rooms, it's rather uneventful, and the designers make some redundant decisions, such as repeating -- and not elaborating on -- the falling rods setpiece.
%2B%5B!%5D.031.png)
%2B%5B!%5D.032.png)
Screenshot #1 depicts what I consider to be the second-hardest jumping challenge of the stage. Droplets fall between where Simon and the first mechanism are; and with the mechanism's closeness, there's not much room given for aerially moving to the right. Being very deliberate is a must here. A good piece of level design. Predictably and annoyingly, Konami put the knife subweapon in that candle to the right. Most unknowing players will whip the candle when they're right under it, since its enclosed position makes that the most convenient spot to do so. Past this is a route that's sheltered by an upper path. Mechanized stalactites poke in and out of the ceiling (somehow there's enough room for them to retract and be unseen) and can kill with the slightest poke. You can walk through here if you're careful, but there's no real reason to when you can just crouch-walk. This is a part that needed something more -- bats that slowly came from the left and right, perhaps, with a fire eye hovering above and out of reach. The only things these stalactites do is make you worry about your finger slipping on the D-pad and Simon suddenly standing up.
%2B%5B!%5D.033.png)
%2B%5B!%5D.035.png)
I'm torn about stage 8's penultimate challenge. It's a bridge of platforms that disappear and reappear, with several of those sharpened rods lined up and ready to fall from above. On the one hand, it finally presents an intelligent use of the rods, because once you commit to the bridge, the platforms' fleeting appearances prompts forward movement mixed with some squiggly jumping that can be complicated by the rods. On the other hand, it seems to me that the platforms' magic act is actually randomized, or varied to a degree that makes distinguishing a pattern within a reasonable time frame (e.g., five to ten seconds) difficult, if not impossible, and I'm not totally convinced that this sort of design is complemented by the heavy, relatively dedicated jumping mechanic. No matter how many times I play SCV4, doing this always comes down to responding to some moment when a lot of platforms are present and hoping for the best from there.
%2B%5B!%5D.039.png)
%2B%5B!%5D.041.png)
It's too bad that Frankenstein's monster offers such an unexciting fight after Sir Grakul, and that it pretty much comes down to Konami's decision to let you whip and nullify the beakers he tosses to effect chemical reactions on the floor. Once you discover that this is possible, the fight may turn out to be you standing right next to the monster, whipping furiously, and only pausing to whip upwards at the occasional beaker. The platforms do make sense, with the monster walking to either side of the room and unable to be jumped over unless Simon is on an upper platform. And since the monster can create a weaker clone of itself, options for temporary escape are especially necessary. There was an interesting fight here, with the monster's scale and the floor as a possible danger zone, but Konami flattened it with a mechanical liberty. Still, I'll take this over Castlevania's version any day.
Next time, we'll be looking at Dracula's abundant and glimmering treasury.
No comments:
Post a Comment